MERRY CHRISTMAS
Saturday, December 25, 2010
 |
| 1. red berry wreath, 2. grace's bell, 3. christmas 2007, 4. christmas present from my mom.., 5. christmas lanterns, 6. christmas 2010, 7. Barack Obama - the second coming, 8. christmas market, 9. Nativity Scene St Patrick's Cathedral, 10. 346., 11. North Star, 12. Christmas crackers, 13. Christmas Ornament on Fir Tree, 14. 2007-1220 (103) Christmas 2007, 15. a Christmas Parade, 16. .christmas snowflake food |
Packing Up Presents
Thursday, December 23, 2010
Along with the gift tags, cards and notepads I've been making for presents, I decided to make some sets of mini notepads that you could just throw in your bag.
I made sets of 4 mini notepads which were 3" wide by 6" high. They were made using printer paper and a piece of patterned paper and simply stapled together.
To package them up I just put the 4 mini notepads in a cello bag and added a scallop square with what they were and how many.
These were really quick and easy to make.
Now that the presents were coming together I just wrapped them up in some gold tissue paper and added them to the gift bags.
I made the gift bags by taking apart an old gift bag and using it as a template.
I thought the gift bags were a bit plain so decided to stamp them with a snowflake stamp in cloud white versa magic ink.
To finish the bags off I added a gift tag. The trees on the tags were made using the tutorial by Teacher Jessy.
In total I made 8 sets of presents, contents varying slightly, but all had a gift bag and gift tag so were slightly time consuming, especially the bags, but were worth it looking at the end of the end result. Not too fancy but prettier than basic wrapping paper.
Gift Card Holder
Wednesday, December 22, 2010
For two of our nephews, we decided to get them a gift card. The gift card came in a tatty envelope so I decided to make a gift card holder for them.
It was quite easy to make as I go the template from Kerry's Paper Crafts.
I used a piece of patterned paper from Dovecrafts fancy Christmas and added the scallop circle with the stamped tree.
The alphabet stamps are from Stampendous and the happy Christmas stamps are from Personal Impressions.
To make sure that the holders stayed shut, I used a piece of Velcro.
So now I had a much better way of presenting the gift cards and they were personalised too.
Sprucing Up Notepads.
Wednesday, December 15, 2010
This year I chose to make as many Christmas presents as I could and decided to make presents for the adult females. I decided to make sets of cards, notepads and gift tags.
First I made these gift tags last month. Then I made some notepads.
I used basic notepads from Wilkinson's and jazzed them up.
I added kraft card to the front and then added some Basic Grey Kioshi paper with some ribbon.
I thought they were abit plain and decided to add a dotted line with a white gel pen.
The tops of the notepads had black tape so I added a white scalloped piece of paper.
I punched a 2" scallop square, stamped NOTES with Stampendous tiny alphabet and added tiny Martha Stewart butterflies and inked the edges.
To package them up, I used a glassine bag and just taped them up using some Japanese masking tape.
 |
| This green paper is from Making Memories Just Chillin - Girl. |
I will show some of the other items soon.
Well I managed to send off the presents for the people further away and just need to send a few Christmas cards which I had better hurry up and send!
Sales Tracker Download
Wednesday, December 08, 2010
I just wanted to share the Sales Tracker thar I created that you could use to keep track of your orders, if you have a shop on Etsy or Folksy, for example.
It's quite a simple tracker but I think it does the job and can help you keep track.
I have created a page, which can a reached by clicking on the word download under the header and this is where all the downloads that I create will be kept for easy reach and I will be creating more so stay tuned.
It's quite a simple tracker but I think it does the job and can help you keep track.
| Download Sales Tracker |
I have created a page, which can a reached by clicking on the word download under the header and this is where all the downloads that I create will be kept for easy reach and I will be creating more so stay tuned.
This card was sooooo much easier than normal.
Friday, December 03, 2010
This is a card that I made fro my brother in laws birthday. Usually when it comes to male cards, as I've said before, I find it hard to be inspired. This time I knew what I was going to do.
I've recently bought the Basic Grey Max and Whiskers 6x6 pad as I didn't have much masculine papers and I found the stamp set at TK Maxx. It's the American Crafts Birthday stamp set.
I used the Candy Cane Stripe Cuttlebug embossing folder and some American Crafts buttons and the card came together quite quickly.
I've made a few more cards recently, some were birthday cards, which I will be posting soon.
Have a great weekend.
White Butterfly Mobile
Friday, November 26, 2010
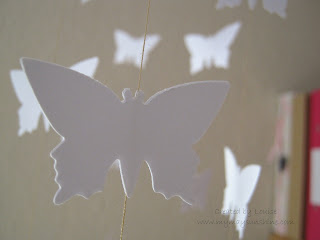
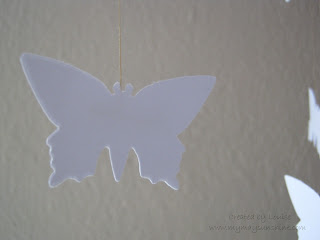
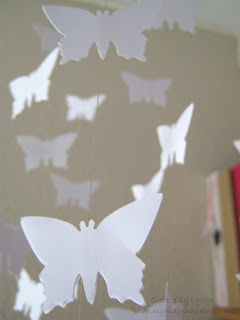
I recently decided to make a hanging mobile and knew that I wanted to use white butterflies but I scoured the house to see what I could use as a hoop and came across 2 embroidery hoops that my mum had given me, one small and one large. I thought that they would be perfect.
I chose to use the smaller one aswell and secured it inside the larger one and that would enable me to have another layer.
I added some twine to attach the mobile to the hook in the ceiling and it was done.
When the mobile was hung, the butterflies started to turn individually which adds more of an effect. It now hangs above my craft desk and it's soothing to look at.
A bit about me.
Monday, November 15, 2010
Today I thought I would give you an insight into me.
Over the last 5-6 years I've suffered from Seasonal Affective disorder (S.A.D) and would never realise how bad I was affected by it each year until spring and the sun would make me feel better.
My Mum bought me a S.A.D lamp a couple of years ago and I have used it, for an hour a day a few days a week over the winter, ever since and can really say, for me, it has really helped.
I don't have anywhere near the low moods I used to. So if you suffer from S.A.D and haven't tried a lamp, it may be worth trying.
A bit of a random post I know but I just wanted to give you an insight into my world and if it helps anyone else, great, as the world can feel like a gloomy place at this time of year, in the U.K. anyway.
Ooh that was getting a bit low and on a brighter note! I have been busy and have added some new items to my Folksy shop too.
Christmas is coming..... fast.
Saturday, November 13, 2010
Well I have been busy making gift tags as part of some gifts for Christmas. I really enjoy making things in bulk and packaging them all up. Is that strange? I don't know. Anyway here are a couple of pics of some of the gift tags I've made.
To package them up I just pop them in a glassine bag and add a piece of Japanese masking tape and then the bags will get added to gift parcels.
Pink and Blue Wedding Card.
Monday, November 01, 2010
This is a card that I made for a wedding reception we went to recently. I seem to us the same template for all the wedding cards that I make, the cake and the flower and just change up the colours and papers.
To make the cake I just ran a piece of white card through the swiss dots embossing folder and cut 3 pieces which were slightly different sizes. Then I just rounded the corners of the pieces and assempled the cake and added the ribbon.
The flower is made from 5 1" flower punch shapes, which you fold four pieces and stick half on top of the previous piece if that makes sense.
The stamp is from American Crafts enjoy stamps.
Well I cannot believe we are November already and the clocks here in the u.k have gone back an hour and on halloween. It will be christmas before we know it. Ha.
'till next time.
Items added to Folksy Shop.
Tuesday, October 19, 2010
Hi there, I wanted to show you the items I've added to my Folksy shop.
I've made some gift tags from some Amy Butler paper.
Also, some embellishments sets.
I really enjoy making little embellishments. I like the process of punching, sewing and assembling. It may seem weird, but I really enjoy it. Keeps me sane.
Hopefully I will be adding more soon.
'Till next time.
Introducing my Folksy shop.
Saturday, October 16, 2010
I set up a shop in Folksy a while ago but didn''t do anything else with it.
Well, this week I finally got around to filling it up, well start to.
At the moment there are sets of punches in it but I will graduallly be adding things.
I have added a link in the sidebar at the top if you're interested in visiting it.
As and when I add more, I will let you know on the blog.
Here are some pictures of some of the punches in my shop.
Yellow 50th Card.
Tuesday, October 12, 2010
My Mum asked me to make a card for her friends 50th birthday and this is the card that I made.
I used the Cuttlebug swiss dot embossing folder to the actual card and added a layer of yellow card on top which I inked the edges on both these pieces.
The next layer was from My Minds Eye's Bloom and Grow paper and then used a piece of the yellow cardstock and ran it through the daisy Cuttlebug embossing folder and stamped the sentiment.
The sentiment is from Papermania Clare Curd stamps and just inked the "th" from birthday to make the 50 "th", If that makes sense.
I just used two chipboard numbers for the age which I inked in brown ink and added some glitter to the yellow card.
My mum thought it was nice so hopefully Jane did too.
Tartan Star Card.
Monday, October 11, 2010
This is another masculine card that I made recently to put in my stash as there are very few masculine cards in there at the moment.
I used the Cuttlebug Candy Stripe embossing folder on the first layer of card and inked it with blue and then brown.
I cut the zigzag border on the spot paper and cut out the large star. The circles and small star were punches.
The paper was from the Making Memories Just Chillin' boy paper and the stamp was from Papermania Clare Curd stamps.
This card is a 5x7" card so it's obviously a lot bigger than the embossing folder but I think it's better that the stripes aren't over the whole background as it would have been to much.
Teapot Hello Card.
Sunday, October 10, 2010
The stamps sets that I bought recently was the American Crafts Enjoy stamp set and the Papermania Summer Bloom Picnic stamp set. One of the reasons that I bought the Enjoy set was because it has a small damask stamp and I really liked the teapot on the picnic set.
I decided to use the damask stamp as a background and chose the purple as I think that it goes really well with the kraft card. The sentiment is from the enjoy set also.
The teapot and the cup are actually one stamp but they were next to each other and I wanted the cup to overlap the teapot, so I just cut between to create two stamps.
I mentioned I like the purple and kraft together but I also like the way the aqua and purple go together as well.
Right I'm off for a cup of tea. See you soon.
Butterfly Tag.
Saturday, October 09, 2010
I wanted to show you the tag that I made recently. This was my first time that I had tried to emboss something using the embossing powder. Can you tell? I did make a bit of a mess with it, but I think it's ok for my first attempt and I'm just glad I didn't send the powder flying. That's my usual trick.
I made the tag out of white card, punch the hole and used a hole reinforcer of both sides.
I cut the two larger butterflies out from a template by Jenni Bowlin and the small butterfly is the classic butterfly from Martha Stewart punches. The strip at the bottom is green glittery paper and I used the threading water punch from Fiskars. The stamp is from American Crafts Enjoy stamps embossed with white embossing powder.
Well next time I will try to remember to use a dryer sheet to get rid of the static.
Green Butterfly Card.
Thursday, September 30, 2010
Well this week we were supposed to be at Pontins but we only lasted one night but thats a whole other story.
So i thought I would show you the card I made recently.
I used the daisy Cuttlebug embossing folder on the card. I like using the embossing folders on cards that are just plain background, it adds a bit of dimension to them.
The paper is from My Minds Eye - Bloom and Grow and the brown dotted paper is from Making Memories - Just Chillin' Boy ranges. The stamp is from Clare Curd at Papermania, I just inked the edge of most of the pieces and used the threading water punch on the brown dotted paper.
So now I'm back at home instead of being on holiday, I might get some more crafting in.
'till next time.
Card Pouch Video
Tuesday, September 21, 2010
Noticeboard Frame.
Sunday, September 19, 2010
Today I wanted to show you the noticeboard that I have made.
This started out as a Ribba frame from ikea. I then took an old noticeboard and cut the cork to fit the frame.
I took out the glass, left the insert in the front and place the cork behind it. Then I just fitted the backboard back on and voila, a jazzed up noticeboard.
I could have just left the frame as it is but no, I had to jazz it up even more.
So out came the patterned paper, butterfly punches and template, ink and pearls and I came up with 3 different size butterflies.
The little butterfly is from the Martha Stewart 3 in 1 butterfly punch.
The medium sized butterfly is from the Martha Stewart Classic Butterfly punch.
The large butterfly is from Jenni Bowlin butterfly template.
The patterned paper is from Cosmo Cricket Delovely.
I just simply inked the edges of all the butteflies and added the pearls to the large butterflies.
I didn't want to stick the butterflies to the frame permanently so I just stuck them down with white tack as it won't leave a mark but holds the butterflies fine to the frame.
Now i just need to find where I put my wooden drawing pins for the board and we're away.
This is an easy way to create a noticeboard that's something more special than a plain cork noticeboard.
Well, thanks for looking and have a great day.
Subscribe to:
Posts (Atom)




+a.jpg)



+a.jpg)
+a.jpg)

+a.jpg)
+a.jpg)
+a.jpg)

+a.jpg)
+a.jpg)
+a.jpg)
+a.jpg)
+a.jpg)
+a.jpg)
+a.jpg)
+a.jpg)


Social Icons