
posts in
Organising
Baby Wardrobe dividers
Monday, November 27, 2017

I needed to get a gift recently for a baby shower and decided that I would make some of these baby wardrobe dividers.
Instead of designing the wardrobe dividers myself, I decided to purchase some printables from Etsy from a shop called JennaCaseyDesigns.

I decided to make the dividers matching on each side, so I printed each divider twice so I could glue them together before laminating.
Once I had printed the dividers, I cut them out and laminated them to make them stronger.
The dividers needed a hole in them so they could hang on the wardrobe rail. These were a bit tricky to cut out as the perfectionist in me wanted them perfect! I also cut a slot to allow you to hang the dividers on the rail.
One thing I did realise was that I cut the laminate to short on the sides of the dividers, so they started to come apart, so I had to glue them to keep them together.

The dividers were so cute as they had lovely woodland animals on them and were a set of 8 dividers which were labelled Newborn, 0-3 months, 3 months, 6 months, 9 months, 12 months, 18 months and 24 months.
They were a cute little set to give as a gift.

Childrens Memory Boxes
Friday, January 29, 2016

From the sentimental items as a newborn to the artwork that's collected in school, storing the childhood memories for you and your child is important.
I have 2 boxes for each of the girls, one baby box and one for items as a toddler onwards. I will show you what I have kept for Hollie as she is the eldest. Most of the boxes are from Homesense as they have some lovely designs and sizes.


The first box I have used is for items when Hollie was a baby. It's so lovely to keep the sentimental items that mean a lot to you and your child.
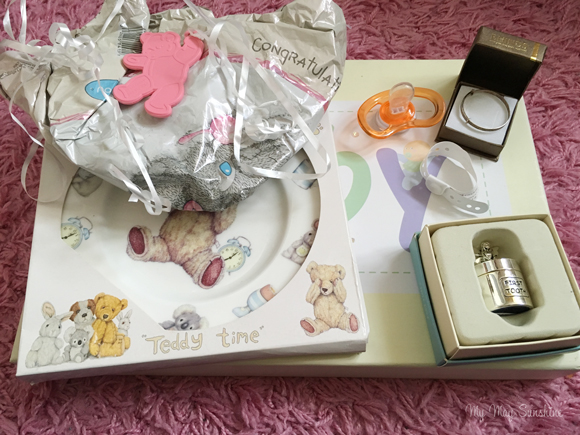
The items that I have kept in the baby box are gifts that were given to Hollie when she was born like the first tooth box, a bracelet and a plate as well as a congratulations balloon and the hospital tag.


Also in the box are some photos that were taken at nursery and school and show Hollie making things and interacting with other children.

There is also a special good bye card from when Hollie left nursery, a drawing of her hand and her baby book.

I have also included the first sleep suit that Hollie wore as it didn't fit in her baby box and also some certificates that she has received over the years like attendance.

I have filled Amelia's baby box and have started her second box already. It's great to be able to put things straight in the box that we want to keep and know it's safe.
Hollie's boxes are quite full already but Hollie is at the age now where she doesn't do as much creative projects in school or home any more and so won't fill the box up with big items but I can always buy another box, it's not a problem.
I am so pleased that I have implemented these boxes as it's so easy for the girls to be able to look in the boxes and reminisce.
Is this something that you have or would like to create for your child/children? I would love to know your thoughts in the comments.


Organising kids craft supplies
Thursday, December 10, 2015


DVD Organisation & Storage Update
Tuesday, October 13, 2015

One thing that has been on my to do list is to update the DVD storage. I did a blog post about my DVD organisation back in 2011 but felt it needed changing a bit.
I decided to keep the DVDs in the clear plastic sleeves like I used last time but made some new labels so that they could have the name of the DVD on it.

I used a standard rectangle sticky label and used a part of a scallop square punch to jazz them up a bit. I also used a different colour pen to show whether it's a kids/family DVD or mine and my husbands DVDs.

I wanted to make some dividers so the DVDs could be separated. I knew that they would never be stored alphabetically but I thought that if created dividers which can be for 2 letters then it would help us be able to find the DVD we want a little easier.

I made the dividers out of some kraft card and some patterned paper. I then added a circle label to the top left hand side and wrote on them the 2 letters the dividers were for.

To make the dividers more sturdy, I was going to laminate them but I didn't want the edges to be too rough so I used some clear adhesive plastic that is used to covers books.

The box I used before was a plastic Really Useful box but it wasn't big enough so I found a box I already had that was big enough but also strong enough. I was going to use one of the white Ikea boxes but I didn't think they would be sturdy enough.
To the front of the box I added some foam letter stickers on the label to spell DVD.

The other thing I did last time for the DVDs was to store the sleeves with all the information on in a folder.
This time I used a smaller folder but it was very boring grey colour, so I covered the folder with some pretty fabric.

To secure the fabric to the folder, I used some basic pva glue. It worked well but in some areas you could see some of the glue as it was a light fabric and was probably a bit too thick layer.

Covering the folder with fabric works better than paper as it doesn't rip but I didn't think about the metal parts of the outside of the folder which have gone rusty so they could have probably done with a little bit of varnish to stop them going rusty and showing through the fabric.

For the DVD sleeves, they are simply hole punched and put in the folder so if anyone want to see what films we have or any information on a film, then they find it in this folder.
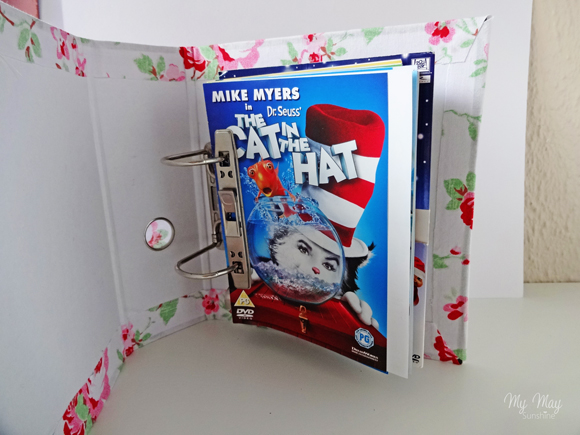
I got a comment, on the first post I did on DVD organisation, saying I had ruined my DVD collection but this system works for us. It saves having to store lots of DVD boxes, the kids emptying the boxes everywhere and keeps them more contained and organised.
What do you think? Is this storage for DVDs something you would try or do you prefer to see all the DVD boxes? I would love to know what you think!


Mission Toy Organisation
Tuesday, February 24, 2015

Recently I have been on a mission to try and get our house more organised. I have been moving furniture around the house to try and make things work better but it has been tricky.
We live a 2 bedroom house so the girls share a bedroom. It's not a small bedroom but not a large one so organisation as key. Well you would think but with Christmas and 2 birthdays, there is a lot of stuff in the house.
Yes a lot of it is mine, but I can keep that in check to a point but when it comes to toys, it seems to take over the house.
So I have decided to document my progress!
I wasn't sure whether I wanted to show the complete mess that is my home but hey ho lets go for it. I'm keeping it real!
This is the girls room. Hollie has a bunk bed which I took the bottom slats out and originally had Amelia's cot bed under but wasn't working with Hollie throwing things into the cot that Amelia could get hold of so I moved it the other side of the room.
Bunk beds are a nightmare to get to the top bunk and so it looks like this! No sheet and clean bedding ready to go on but the bed needs emptying before I can change it!

This is on the landing and has some of my craft stuff as well as more of Hollie's toys.

This is the other side of the dining room which is a playroom and craft space and where I wanted to keep most of the toys but that never happened.

These are Amelia's toys, well some of them. She has more in a large wooden box. Some of these are Hollies too like the truck and the barbie car but Amelia likes them so they end up in here.

So I really need to go through the mass amount of toys and stuff and really sort out some organisation for it.
I have no idea how long it will take me but I hope to have a clearer house at the end of it. It does give me a lot of anxiety so I thought that writing a blog post about, yes it can be embarrassing but would push me to sort it.
Wish me luck! I have a feeling I may need it and if you see a pic on instagram of a large skip, you know it got the better of me! I'm definitely craving some organisation!
If you have any tips or tricks for toy storage, I would love to hear them.
Gift wrap box
Wednesday, February 11, 2015

For a few of the people that I needed to buy presents for, for Christmas, I decided to make them a gift wrap box for them.
I started off with a white box from Ikea and simply added a label to the front of the box with the words gift wrap stamped on it. I decided to keep the outside of the box simple so that it could fit in with any decor.
This is what I added to the box.

I started by adding a few stationery pieces like scissors, tape, binder clips, a notebook, pen and post it notes. I added some twine, some labels that could be used on presents, envelopes etc and some pretty washi tape.

I put in some tissue paper in a few colours and also put in some paper bags that I just added some patterned paper to, to jazz them up a bit.

A long with these items, I decided to make some cards and some gift tags too. I made some female that had bows and butterflies on and then some masculine cards with banners on. I made some gift tags with a punched heart or flower and added some bakers twine to them.

I wanted to add more but didn't get the time and I thought that they could add things to the box they already have or get in the future and then can keep it altogether.

I think that a gift wrap box is a great gift and the people I gave it to loved it.
Would you consider making a gift wrap box? Would you like to receive one as a gift? I Would love to know.
IHeart Organizing
Subscribe to:
Posts (Atom)


Social Icons