Birthday card for mum.
Friday, December 30, 2011
I hope you all had a great Christmas and are looking forward to the new year. I had a good Christmas and definitely hope next year is good.
My Mum's birthday was on the 20th of December and as it's so close to Christmas I nearly forgot all about it.
We decided to buy her an apron for her birthday, as she had mentioned she couldn't find hers, and then she would get the rest of her presents on Christmas day.
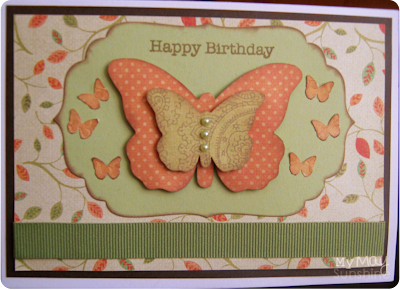
This is the card that I made her.
Paper - Cosmo Crickets DeLovely.
Stamp - Amy R Best Birthday wishes.
Punches - Martha Stewart Classic butterfly,
3 in 1 butterfly punch and Doily Lace punch.
Heart and large butterfly - templates.
Twine - The Ribbon Reel.
Glitter - Stickles.
Merry Christmas.
Sunday, December 25, 2011
'fabulous' purple butterflies and flowers card
Tuesday, December 13, 2011
So Hollie has one week left at nursery and then she is off for two weeks. So I have been thinking of the things that she can make to keep her busy. We have some pom poms, googly eyes, pipe cleaners, beads etc, it could be interesting.
For this card I decided to do some layering of paper and card on this card as I think it shows off the patterned paper more. The sentiment is actually made from 4 phrases from the My Pink Stamper's Fabulous Phrases stamps. There are many different styles and sizes of stamps in this set but can be mixed to make a new sentiment.
As the patterned paper is quite busy already, I decided to just add a few butterflies and a flower with gems and some simple cream ribbon.
Paper - Basic Grey Kioshi.
Stamp - My Pink Stamper Fabulous Phrases.
Punches - Martha Stewart Starburst, 3in1 classic butterfly and Monarch Butterfly.
EK Success - flower.
Ribbon and gems - Local craft shop.
Simple beaded butterfly card
Friday, December 02, 2011
So it's December. I am gradually getting things ticked off my Christmas gift list and have been making gifts too. I figured that teenagers (and adults) tend to just get themselves what they want when they want and so I would make presents for a lot of the females on my list. This involves cards, gift tags, notebooks etc. I did this last year and decided to do it again this year. I'm sure I will show what I've made soon.
For today's card, I drew around a butterfly template to create the butterflies and decided to add some beads on some thread to the centre of each butterfly. I decided to keep the background plain but added a lined border and a dashed line on the butterflies to make it less plain.
Paper - Basic Grey Lemonade.
Stamp - My Pink Stamper Fabulous Phrases.
Twine - Ribbon Reel.
Beads - Local craft shop.
Daisy dot card
Thursday, November 24, 2011
So we have put up our christmas tree already. It is early I know but my husband and daughter kept asking so it went up. I am beginning to think though that I will have had enough of it before christmas day but never mind.
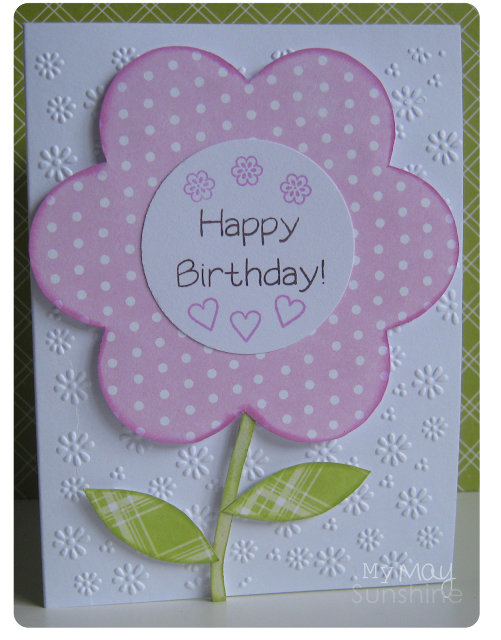
So this card is my attempt to make a card for a younger girl.
Paper- Papermania Summer Bloom.
Stamp- My Pink Stamper Fabulous Phrases, Hero Arts All Occasions.
Ink- Versacolor and Colorbox.
Embossing Folder- Cuttlebug Daisy.
This card started with a flower die cut template from Jenni Bowlin, which I just drew around on to the pink polka dot paper and made the stem and the leaves to go with it.
Adding the daisy embossing on the card base just jazzed up the plain card base as the card itself didn't need anymore colourful pattern as the flower is so big.
P.S To all the Americans, Happy Thanksgiving.
Have a great day.
Laminated lists and drawing board.
Tuesday, November 08, 2011
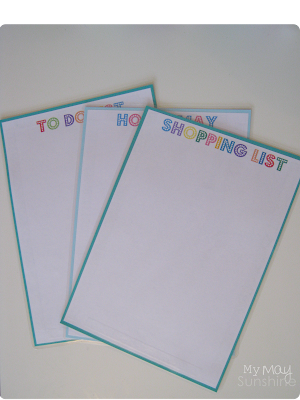
There are some great printables around for all sorts of different organising, some of the I have used and still use but when it came to a shopping list and to do list I decided to do something different.
I chose to create a list that I could use again and again and would cost any more. I decided to create some laminated lists that were pretty but functional.
I started with creating a header on a piece of A4 paper which was created in Microsoft Word.
Then took a piece of card which I cut to fit the laminating pouch and then cut the A4 piece of paper down to fit the card and stuck it down.
You simply laminate the card with the piece of paper attached, trim the laminate if have excess and voila, one laminated list.
To draw on the laminated list I decided to use crayons instead of pens as they can get messy.
I use the Crayola dry erase crayons. They work well on the boards and are great for kids as they are washable.
So next item I decided to make was a board that my daughter could draw on.
This board was done exactly the same was as the lists. I decided to put her name on the top to help her learn it but you could put whatever you wanted or could leave it blank.
This is the artwork that Hollie created.
They would be great to use at home but also great to use in the car as they are very light and portable.
You could make smaller ones, books or lined ones to help with writing. There ideas are endless.
Linking up to:
Giveaway: My Memories Suite - closed.
Monday, November 07, 2011
I've never really gotten into scrapbooking mainly because I rarely print photos out these days. So when My Memories contacted me to try out their digital scrapbook software and give one away, I thought it would be the opportunity to try out some scrapbooking.
The software is called My Memories Suite and is very easy to use and I found the layout option helpful.
Here are two of the pages I've made so far:
My Memories have offered a discount to my readers. Using the code
STMMMS74715
will get you $10 discount off the My Memories Suite scrapbook software and get another $10 off products in the My Memories store, a total of $20 savings! Simply copy and paste the code into the promotions code box. Don't forget that as the products are digital, it doesn't matter where you are in the world!
My Memories are also offering one person the chance to win the My Memories Suite Software (worth $39.97).
All you have to do is leave on comment on this post with a way to contact you and the winner will be chosen by random.org. Closing date is midnight on Monday 14th November 2011 (UK time).
Good Luck.
I wasn't compensated for this post, opinions are my own. I received this product for my honest review.
Simple Washi Tape Banner Card
Sunday, November 06, 2011
So Halloween has gone, bonfire night has gone and the clocks have gone back, so are we ready for Christmas? he he. I have hardly started. I know it will come quickly enough though.
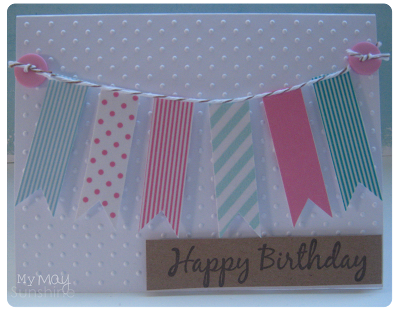
The card today was made using simple washi tape. I love washi tape, all the different colours and patterns.
I decided to make a banner card and use the washi tape on the banner.
Card - Craftie-Charlie.
Stamp - Papermania Clare Curd Sentiments.
Washi tape - Papernation and Papermash.
Twine - Ebay-jingle...bells.
Buttons - Hobbycraft.
Ink - Versamagic jumbo java.
Keeping the background simple with just swiss dots brings the banner to the focus.
Hope you are all having a good weekend .
Ribbon Girl Challenge #12
Saturday, October 29, 2011
I decided to make this card for the Ribbon Girl challenge #12, which was to make a card using lilac and green.
I have seen there is so many wonderful cards entered but I thought I would give it a go.
For this card I used the Basic Grey Kioshi papers as it's full of subtle purples and greens.
Paper - Basic Grey Kioshi.
Stamp - American Crafts.
Flower - Papermania.
Button - Papermania.
Twine - Ribbon Reel.
Large Butterflies - template.
Small Butterflies - Martha Stewart 3 in 1 punch.
Border punch - X-cut.
I did the top half of the card first with the big butterflies and the flower and it took me a while to decide what to do at the bottom.
I finally decided to do some hand stitching in the purple and green and add some little butterflies and the card came together.
Hope you have a great weekend.
Utilizing embellishments differently
Thursday, October 20, 2011
When I came across Wendy Mckee's blog post last year about how she would trace around butterflies from the Internet or die cuts to use in projects I thought was a great idea as you can get so many shapes of butterflies and would bring a bit of diversity to the cards.
I had some die cut butterflies from Jenni Bowlin and didn't want to give them up too soon so I just traced around them and cut them out. That was how I got the two middle butterflies.
Paper - My Mind's Eye 'Bloom and Grow'
Die - Nestabilities label four
Small butterfly - Martha Stewart punch
Stamp - Hero Arts
I don't have a digital cutting system or very many dies for die cutting so sometimes you just have to think outside the box.
Organising and storing DVD's.
Thursday, October 13, 2011
~ I have since updated this storage here. ~
Time and time again my daughter would take the DVD out of the case and leave the DVD sticky and with scratches, which can effect the DVD.
I decided that I needed to store the DVDs differently, ultimately leaving the DVD covers available to view, as my daughter loves to look at them to chose a DVD, but to store the DVDs in a box in a cupboard.
So I started with a binder and a box.
In the box I used CD/DVD clear cases and put the DVDs in them starting with the kids.
On the front of the DVD cases I put a star which was punched from a sticky label.
In the binder I took the DVD covers and stuck them to a piece of paper and added them to a plastic wallet/ pocket.
To keep the paper from slipping out of the plastic pocket, I taped the top.
To help find the DVDs easier I stuck a star on the front of the pockets, on each DVD cover. Then just wrote the numbers on the stars on the DVD covers and DVD clear case so they matched.
To finish off I just created a label for the front and spine of the binder so we knew what it was and the binder sits next to the t.v.
My daughter loves to be able to just flick through the binder to find a DVD and then we can find the DVD in the box by looking for the number.
When a DVD is in the machine, the clear case sits at the front of the box so we can easily put the DVD back in and put back in the right place.
Linking up to : Crafty Soiree, Clean and Scentsible, Today's Creative Blog, Chic on a Shoestring, The Shabby Nest, Remodelaholic, Tip Junkie , Today's Creative Blog, My Uncommon Slice of Suburbia, Skip to my Lou, Sew Can Do
Cute simple card set
Thursday, September 29, 2011
I like making sets of cards to give as presents and like to find different ways to present them.
This time I chose to just make a small set of four cards with envelopes and make a little book to put them in.
Paper - My Mind's Eye Bloom and Grow
Flower - EK Sucess punch
Butterfly - Martha Stewart punch
Twine - Ribbon Reel
Ribbon and button - Local craft shop
I chose to keep the cards the same design but with different sentiments and patterned paper.
Papers - My Minds Eye Bloom and Grow and Papermania's Summer Bloom.
Twine - Ribbon Reel.
Flower - EK Success punch.
Stamps - My Pink Stamper's Fabulous Phrases.
Embossing folder - Cuttlebug Swiss Dots.
All four sentiments came from the same stamp set - My Pink Stamper's Fabulous Phrases and nearly all the patterned paper was from Papermania's Summer Bloom so it was easy to put together.
On the inside of the book I covered the lower flap, on each page, with patterned paper and secured the sides with a brad so it is easy to slip in the card and envelope.
I think they turned out really cute and makes a nice little present.
Subscribe to:
Posts (Atom)









Social Icons