Cute simple card set
Thursday, September 29, 2011
I like making sets of cards to give as presents and like to find different ways to present them.
This time I chose to just make a small set of four cards with envelopes and make a little book to put them in.
Paper - My Mind's Eye Bloom and Grow
Flower - EK Sucess punch
Butterfly - Martha Stewart punch
Twine - Ribbon Reel
Ribbon and button - Local craft shop
I chose to keep the cards the same design but with different sentiments and patterned paper.
Papers - My Minds Eye Bloom and Grow and Papermania's Summer Bloom.
Twine - Ribbon Reel.
Flower - EK Success punch.
Stamps - My Pink Stamper's Fabulous Phrases.
Embossing folder - Cuttlebug Swiss Dots.
All four sentiments came from the same stamp set - My Pink Stamper's Fabulous Phrases and nearly all the patterned paper was from Papermania's Summer Bloom so it was easy to put together.
On the inside of the book I covered the lower flap, on each page, with patterned paper and secured the sides with a brad so it is easy to slip in the card and envelope.
I think they turned out really cute and makes a nice little present.
Been Busy Handstitching
Tuesday, September 27, 2011
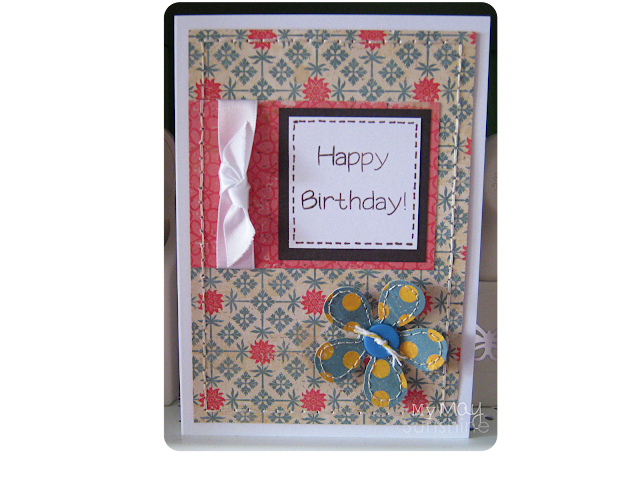
I have recently got into adding stitching to cards but instead of using a sewing machine I decided to hand sew a card that I needed to make for a friend.
Paper - Crate Paper Restoration.
Stamp - My Pink Stamper Fabulous Phrases.
Flower - EK Success punch.
Twine - Ribbon Reel.
I hand sewed around the outside of the patterned paper and around the flower.
Obviously it helps if the lines are straight but even when machine sewing, the lines aren't straight sometimes so it didn't matter.
I chose to use a simple sentiment stamp with this card as the paper is very patterned, so it would help to balance the card.
I found stitching quite therapeutic and will definitely be doing some more soon.
Fishy Crayons
Wednesday, September 21, 2011
After seeing the idea of melting crayons on Meet the Dubiens I thought I'd give it a go as we have a lot of broken crayons hanging around the house.
So I took the wrappers off the crayons and broke them into small pieces.
Then added them to a glass pot inside a saucepan of water which I then put on a medium heat until the crayons had melted and then took it off the heat.
I bought an ice cube tray from Ikea in the shape of fish. I chose the fish as I thought they would still be easy enough to hold.
I poured the melted crayons into the mould and let them to set for a few hours. They crayons stain the mould and obviously the mould was bought for this purpose and won't be used for ice cubes!
Once they were set, they were ready to come out of the mould and ready to do some colouring.
My daughter loves to just line them up in colours too!
Linking up to:
Butterflies times eight
Tuesday, September 20, 2011
After finishing up another project recently I found I had some leftover punched butterflies and decided to make a simple thank you card.
Paper - Basic Grey 'Origins'
Punch - Martha Stewart butterfly punch
Label - Nestabilities label four die
Stamp - American Crafts 'Thanks'
This card would have been simple to make if I had decided to just stick the butterflies on the card but no I decided that I needed to add a few stitches down the middle of each butterfly to add something to them.
So I decided that I would actually stitch them onto the card stock so that I didn't have to fiddle with gluing them to the card and so the wings to flutter.
Apart from that it is a simple in design card and the butterflies add the colour while the background is simple plain brown.
Wire Jewellery Frame
Wednesday, September 14, 2011
After seeing many people's versions of the wire jewellery frame, I decided to make one for my sister's birthday.
I already had the chicken wire and the frame, which is the frame from a canvas.
I took the canvas off the frame and painted it white.
I attached the wire to the frame with drawing pins as they worked very well to secure the wire down.
To add some colour to the frame I added three flowers that I made out of patterned paper and colourful brads and stuck them to the frame with a glue dot.
I then just added some ribbon to the frame so that it could be hung up. Lastly I just added some nails to the side and bottom of the frame so that necklaces and bracelets could be hung up as well as hair accessories and earrings on the wire.
My sister liked her present and I think it is nice to add hair clips, grips and even hoop earrings (there is one lonely hair clip right at the bottom).

Bringing out the dogs
Tuesday, September 13, 2011
What do you put on a card for a boy turning into an official teenager? I say official as most act like one long before 13! I did get slightly stumped but decided to go with the simple sentiment and a banner.
Paper - Basic Grey 'Max and Whiskers'
Stamp - My Pink Stamper 'Fabulous Phrases'
Label die - Nestabilities Label one.
Ink - Versamagic brown and distress ink Antique Linen
Buttons and pearls - local craft store
I decided to keep the background paper, with all the dogs on, as the focus and the embellishments and sentiment the same colour tones so it kind of blended in but with 3d embellishments, like the banner and the buttons, so they stood out too.
Fabric Notebook Cover
Wednesday, September 07, 2011
For my sister in law's birthday, back in February, I decided to make a notebook cover out of fabric.
I purchased the pattern from jcasa on etsy.
It is an easy to follow pattern and I enjoyed doing some sewing. I did decide not make the quilted front though.
On the front I made 3 yoyo flowers with a button sewn into the middle.
I decided to add a notebook inside. The front of the cover wasn't very pretty so I took it off and added Kraft card and then added some paper.
I used Crate paper's Restoration paper on the front of the notebook and added a line of zigzag stitching, on the sewing machine, at the top and bottom of the paper.
To finish it off I added a pen and sewed on a button on the front and some elastic to the back so that the notebook cover could be done up.
As it was my first attempt, it wasn't very straight at the back but it was fine and made a really nice present.
Linked up to:
Subscribe to:
Posts (Atom)


Social Icons