WOYWW 178
Wednesday, October 31, 2012
On my desk this week are things that I am going to use to package up a couple of card sets that I have made, maybe for Christmas presents.
I love to make card sets up in advance as they make great gifts to have on hand.
So, I have my cake stand full of washi tape. Washi tape is so easy to get hold of now and I tend to buy mine from Ebay as they have so many different colours and styles.
Also from Ebay I buy the glassine bags in different sizes to package items up in.
Also I have my box of bakers twine. I use a Ikea Krus container to store the twine. I only have 2 big spools which fit on one side and then all the smaller amounts of twine in different colours are wrapped around tags to store them, in the other side.
The card sets are all the same design but are different patterned paper and sentiments.
I love this embossing folder, by Cart Us - trendy circles, for the background as it fills out the space well and then I just added some simple Martha Stewart butterflies with some pearls from MEI flower and a sentiment.
I just went through my stamps to find a range of different sentiments to make every card different.
So that's what on my desk today and I am planning to get them packaged up and make some tags to go on the front. I am sure that I will show the finished result soon.
Have a great Wednesday.
Linking up to Stamping Ground.
DIY jar pumpkin
Monday, October 29, 2012
Today's Halloween project came about as I wanted to do something with an old jam jar. It wasn't until I went to Hobbycraft that I came across some orange crepe paper and the idea went from there and I decided to use the crepe paper to make a jar pumpkin.
So I started with the jar and simply added a piece of the crepe paper all the way around so it covered most of the glass. Then I just cut strips of the crepe paper and wrapped it around the jar, twisting the crepe paper at the same time until it was covered.
Next, I cut out a pumpkin face from a template I found here and then glued it to the side of the jar.
I got a battery operated light from Wilkinson's for 50p and thought that this would be perfect to place inside the jar.
This is a picture of the pumpkin jar without the light turned on
and this is the pumpkin jar with the light turned on.
I think this looks really cute and different. Hollie thought it was good too and was intrigued with the light.
I was great for Hollie as it wasn't a real candle so it didn't need to be watched and wasn't dangerous.
So that's it for my Halloween projects this year. We have only made a few things and haven't bought many Halloween items as Hollie is only 4 and doesn't not like anything too scary.
Hollie and I have had great fun with the projects for Halloween and I hope you have too.
Have a happy Halloween, if you celebrate it.
See you soon with more inspiration.
Linking up with Polkadot Pretties, Sew Can Do
Origami Halloween Ghosts
Friday, October 26, 2012
This week I have showed the origami pumpkins and origami bats that we have made and today I wanted to show you the origami ghosts we have made.
These ghosts were made using this tutorial and were really easy to make. I just used 4x4 inch white paper, googly eyes and some glue. Hollie had great fun gluing the eyes on the ghosts and said they were friendly ghosts.
I put a ghost in florist frog that I had as I was trying to show the ghost standing up. Kind of works.
So yesterday I said that the bats looked a little lost of their own, so when I added the ghosts, it looked a lot better.
For the ghosts, I used the silver thread again to hang them up.
Here is all the origami Halloween things all together. Hollie loves all the Halloween origami and was happy that they weren't too scary.
Next week it's half term for Hollie, so we will probably be doing more crafty things, not sure yet, so there might be more crafty things on the blog next week. We shall see.
Hope you had a good week and are looking forward to the weekend. See you next week.
Origami Halloween bats
Thursday, October 25, 2012
I mentioned on Tuesday that I enjoyed making some Halloween things using origami and that I was going to make some more, well one of the other things that I made were some origami bats.
I used this tutorial to make the bats and found them slightly more tricky to make than the pumpkins but after I had made a few, I understood how to do it.
All you need to make these is some black paper and I made them in 4 x 4 inch squares but you could obviously make them bigger if you wanted to.
This is Hollies artwork display that I decided to change and put up the bats instead.
I just taped some embroidery thread to the back of the bats and tied them to the rail. They looked a bit lost but I will be adding more Halloween origami to it tomorrow.
I tied them to the rail at different heights and spaced them apart.
Ideally I would have liked to use invisible thread but didn't have any so used silver thread instead.
Here are some close ups of the bats when they were hanging up.
Hollie really liked them and as she is only 4, she said she didn't want anything too scary, so I think they were perfect.
So, I have some more Halloween origami coming tomorrow. See you then.
Linking up to The Shabby Creek Cottage, Yesterday on Tuesday , The 36th Avenue, Somewhat Simple, Chic on a shoestring, Polkadot Pretties, Sew Can Do,
WOYWW 177
Wednesday, October 24, 2012
So it's one week to Halloween and I have been making things for it, as you may have seen from yesterdays post where I show you the origami pumpkins I have made. I have also been making some other origami Halloween things and I will be showing them later in the week but you can spy a couple of them on my desk below.
I have been having great fun using the origami and Hollie has enjoyed seeing how a piece of paper can turn in to things. We've been having great fun with the pipe cleaners, googly eyes and coloured paper.
Right I'm off to make some more bats. See you soon.
Linked up at Stamping Ground for what's on your work desk Wednesday.
Origami Pumpkin jack o lanterns
Tuesday, October 23, 2012
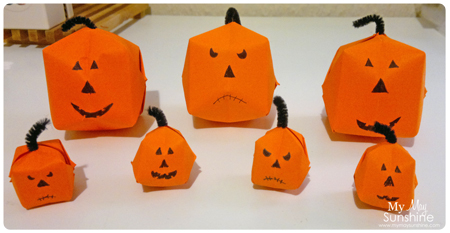
I love to make things using origami, like flowers and stars and so when it came to Halloween, I really wanted to use some origami. I came across this tutorial to make pumpkins and thought I would give it a go.
I thought the tutorial was easy to understand and I quite enjoyed making them.
I made some big ones and some small ones.
To make the pumpkins, I used to some 8 x 8 orange paper, black pipe cleaners and black pen.
For the small ones, I used 4 x 4 inch paper. I did think they would be too fiddly to make but they were fine and Hollie really the little ones.

The pipe cleaner fits neatly in the top of the pumpkin and then I just bent it slightly. You don't need to use of the pipe cleaner for each one so one pipe cleaner can go along way!
The big pumpkins are made from 8 x 8 inch paper.We made some with happy faces...
and some with mean faces.

The best bit for Hollie was the point when you have to blow air into the pumpkin to inflate it and they come to life.
These pumpkins were really easy to make, didn't take too long to make lots and we had the paper and the pipe cleaners in Hollies craft box so we didn't have to buy anything extra. Even better.
However, I decided I wanted to make some other things, using origami, for Halloween and so that meant a trip to Hobbycraft. Won't say no to a trip to Hobbycraft!
I have some more origami Halloween crafts to come later this week. See you then.
Linking up to Sew Much Ado , Clean and Scentsible, Somewhat Simple, The 36th Avenue, The Shabby Creek Cottage, Yesterday on Tuesday, Chic on a shoestring, Polkadot Pretties, Sew Can Do, Skip to my lou, A Bowlful of Lemons, Todays creative blog.
Hollie and school
Friday, October 19, 2012
Hollie has been in school all day for 2 weeks now. I get asked if I miss not having her at home but to be honest, I don't. That might sound mean but we were beginning to get on each others nerves and some time apart I think will make both of us appreciate each other.
This is a photo I took when she started all day.
Hollie loves going to school and makes friends very easily, which is great. She loves being able to wear her school uniform and take her lunch box to school.
As I have mentioned before, she loves to go outside and play and so when she found she would be able to do sports and activities, she liked that idea.
This photo was taken when she started at the beginning of September.
She is a true poser!
Anyway, I am loving being able to get more done around the house and organise and craft more. I can actually say that it has really helped clear my mind, being able to get things done.
However, I realised today that school finishes next Friday for half term for a week and so I'm sure that will make her a little confused as to why she can't go to school that week. I must find things to keep her entertained that week, maybe some Halloween crafts.
Anyone got any ideas for activities or crafts, would love to hear them.
Hope you have a good week and are looking forward to the weekend.
Retrosketches sketch #33
Thursday, October 18, 2012
Yesterday I showed you my desk and the things I had out to make a card and maybe use a sketch to do it. Well I decided to use the Retrosketches sketch #33 and make a Christmas card using the stamp set and washi tape that was on my desk.

Stamps - Marion Emberson Sparkling Christmas | Red washi tape | Gems - Ebay | border punch - Martha Stewart Lacey Doily.
I used some red washi tape around some card and used a border punch on the bottom to create a banner and used the bauble ornament stamps from the stamp set and added some gems to bling them up.
I am not 100% sure I like the card as I really should have put the banner and the baubles on some 3D foam to make them more dimensional and then it might have looked better.
I think it was good for my first attempt at a Christmas card this year. I don't usually make many Christmas cards, as for some reason I think they are harder to make but I know they are not really.
Anyway, hope you week is going well and you are achieving the things you want to get done. I am such a procrastinator and my list gets longer and never seem to cross anything off it. Hopefully I will get things done and it clears my head a bit to do some more crafting.
See you soon.
WOYWW 176
Wednesday, October 17, 2012
I have followed Julia's blog at Stamping Ground for a long time and loved to look at the what's on your work desk posts, but never joined in but today I was inspired to join in.
Here is my desk this morning as I was getting things out to make some cards, maybe using some sketch challenges from this week.
I am the type of person that will tidy away everything when I have finished crafting as my daughter will be playing with it otherwise and can focus better when there is less stuff on my desk.
I really love washi tape at the moment and am trying to sort out my stamp storage as I can't decide whether to store them all in binders or some most used in CD cases so it's easier to grab.
Also I have rearranged my craft space, as any of my family will tell you, I don't sit for very long and get bored (or inspired, which ever way you look at it) to change things around. I will show you some pics when I have finished arranging.
Happy Wednesday.
Skipping Stones Design 148
Saturday, October 06, 2012
I have really been struggling with making cards recently until I came across some cards that had used a lot of stitching on the cards. This seem to get my creative juices flowing a bit but I also decided to use the Skipping Stones Design sketch 148 to help me complete the card.
When it came to creating the strips I struggled a bit with the measurements, trying to make it fit nicely. I still ended up making it smaller than it could have been but it looks fine.
I recently won a prize in a give-away that Paper and Strings did and I got to chose some items and I chose this brown American Crafts ribbon among some other things. Really like it .
This is the sketch.
Paper - Basic Grey Lemonade | Stamp - My Pink Stamper Fabulous phrases | Ribbon - American Crafts | Button - American Crafts | Pin - Ebay | Butterflies - Martha Stewart punches | Glitter - Stickles.
Subscribe to:
Posts (Atom)


Social Icons