
posts in
seasonal
Christmas gift boxes
Monday, December 23, 2013

For a couple of Christmas presents I have bought this year, I needed to put them in a gift box as they were to fragile to just wrap up in paper.
These presents aren't very big and so didn't need large gift boxes, so I wasn't going to hunt out small gift boxes in the shops, I decided I would make them.

I found the tutorials on Chicnscratches 12 days of Christmas videos that Angie has made recently and they are perfect size for the presents.
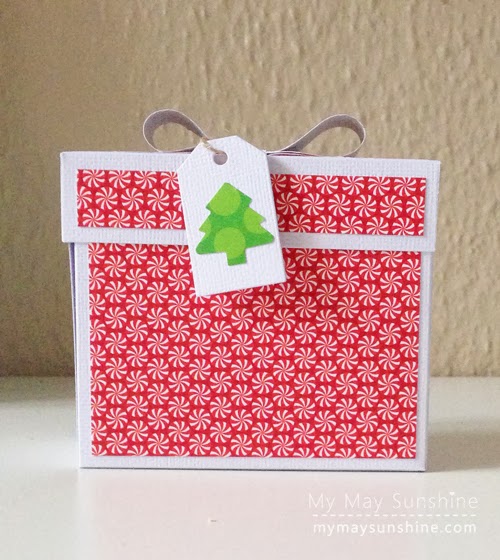
The first box is made using this tutorial from Chicnscratch. I decided to make it with white card and then use some pretty patterned paper from Doodlebug as a layer.
On top I made a bow using the envelope punch board and this tutorial from Knall crafting.
I made a little tag from the Clearly Besotted tag it dies and punched out a little tree.
The second box, I used this tutorial from Chicnscratch.
I decided to make it with the Doodlebug Home for the holidays papers, tied it with some green gross-grain ribbon and a tag the same as the previous box. Love the papers on this box, so cute!


I won't show the gifts that are in the boxes are the recipient might read this but I just wrapped the gifts in some lovely red spotty tissue paper.
I have finished wrapping all the presents and am so glad. If I haven't got it or done it now it, we will have to do without! I'm 37 weeks pregnant and trying to entertain a 5 year old in the holidays, so I'll be glad to have a rest.
Hope you have a lovely Christmas. See you soon.
Christmas stocking gift tags
Wednesday, December 18, 2013

This year, for my gift tags, I decided that I would make some and decided to use the stocking stamp Clearly Besotted Stamps Institches set.
I love the images in the set and have used some of the images on my Christmas cards that I have posted here and here.

To make the gift tags I created the tag from some kraft card and are quite large at 4 3/4 x 2 1/4. I decided to use a circle of red card under the stocking and then use a small die from the Spellbinders Nestabilities label 8 dies, to put the sentiment and snowflake on.
I went with two different sentiments, one from the Clearly Besotted Stamps Signature Christmas and one from the Marion Emberson Sparkling Christmas.
I kept the tags quite flat and just added a little red gem to the centre of the snowflake to add some sparkle.
On the back of the tags I added the to and the from, from the dovecraft gift tag stamp and added some red bakers twine to the attach the tag to the present.


Hope you are having a great week and it's only one week away to Christmas day, It has gone so quickly. See you soon.
Handmade Christmas Decorations
Thursday, December 13, 2012

Yesterday I showed you my little Christmas tree in my craft space and the decorations that I have made. They were really simple to make and today I thought I would show you how I made them.

For the felt hearts I used an cookie cutter to trace around the felt, sewed 2 hearts together using red bakers twine and then stuff them with cotton wool as I didn't have any stuffing so used what I had on hand. I used the left over twine to create a loop at the top.


The little stockings were made simply by using a template and sewing 2 stockings together with embroidery thread and then creating a loop at the top. Then I added a piece of ribbon to the top to add some colour to them.


The little starburst baubles were made using the Martha stewart starburst punch and folding the circle in half and then gluing 7 circles together and attaching some thread to hang them.


These decorations were made with items I had on hand and would be great for a small tree or you could make them on a bigger scale for a bigger tree. Also they are great for a child's tree as there isn't nothing that could break or hurt them and they can help make them too.
Have you made any Christmas decorations this year or maybe you have some decorations made in previous years you add to your tree year after year? I would love you to let me know in the comments.
Hope you are having a good week.
Linking up to Chic on a shoestring decorating, The Shabby Nest, Diana Rambles, Polkadot Pretties, Tip Me Junkie, Lil Luna.
3D Origami Stars
Tuesday, December 11, 2012

This afternoon I went to see Hollies nativity play at school and Hollie was the star. She looked so cute. They all did very well for 3,4 and 5 year old and sang very well. I will include a photo tomorrow.
Today I wanted to show the origami stars that I have made, as I made a few things for Halloween using origami so decided to make a origami star for Christmas.
This is my inspiration from What Suzette makes. Love the colours.

I started with the template from What Makes Suzette Now template and added the flaps to the template. Then just draw them onto some Christmas patterned paper and cut them out, scored them and stuck them together.

The best way is to do it in cones of 2 and then build up the star but the first one I made I didn't do this and it was slightly more tricky.

Before adding the last cone, I added some string through it so it could be hung up.

I used glossy accents to stick the stars together as it allows you to move it slightly before it sets and does stick well but pva glue would work too.

I have a florist frog that I use for my cards but this works well to hold the string for the stars as it is a heavy weight and the string just slots into the grooves.

I found them quite easy to make and once you start, they don't take too long and look great.
I am loving making lots of crafty things for Christmas and there will be more coming up soon.
Have you been making items for Christmas? Leave a comment and let me know.
See you soon.
Linked up to A Bowlful of Lemons, Sew Much Ado, Clean and Scentsible, The Shabby Creek Cottage, Yesterday on Tuesday, Chic on a shoestring decorating, Diana Rambles, Polkadot Pretties, Tip Me Junkie, Lil Luna, Chic on a shoestring decorating, Little Inspration.
DIY jar pumpkin
Monday, October 29, 2012

Today's Halloween project came about as I wanted to do something with an old jam jar. It wasn't until I went to Hobbycraft that I came across some orange crepe paper and the idea went from there and I decided to use the crepe paper to make a jar pumpkin.

So I started with the jar and simply added a piece of the crepe paper all the way around so it covered most of the glass. Then I just cut strips of the crepe paper and wrapped it around the jar, twisting the crepe paper at the same time until it was covered.

Next, I cut out a pumpkin face from a template I found here and then glued it to the side of the jar.

I got a battery operated light from Wilkinson's for 50p and thought that this would be perfect to place inside the jar.

This is a picture of the pumpkin jar without the light turned on

and this is the pumpkin jar with the light turned on.
I think this looks really cute and different. Hollie thought it was good too and was intrigued with the light.
I was great for Hollie as it wasn't a real candle so it didn't need to be watched and wasn't dangerous.
So that's it for my Halloween projects this year. We have only made a few things and haven't bought many Halloween items as Hollie is only 4 and doesn't not like anything too scary.
Hollie and I have had great fun with the projects for Halloween and I hope you have too.
Have a happy Halloween, if you celebrate it.
See you soon with more inspiration.
Linking up with Polkadot Pretties, Sew Can Do
Origami Halloween Ghosts
Friday, October 26, 2012

This week I have showed the origami pumpkins and origami bats that we have made and today I wanted to show you the origami ghosts we have made.
These ghosts were made using this tutorial and were really easy to make. I just used 4x4 inch white paper, googly eyes and some glue. Hollie had great fun gluing the eyes on the ghosts and said they were friendly ghosts.

I put a ghost in florist frog that I had as I was trying to show the ghost standing up. Kind of works.

So yesterday I said that the bats looked a little lost of their own, so when I added the ghosts, it looked a lot better.

For the ghosts, I used the silver thread again to hang them up.


Here is all the origami Halloween things all together. Hollie loves all the Halloween origami and was happy that they weren't too scary.

Next week it's half term for Hollie, so we will probably be doing more crafty things, not sure yet, so there might be more crafty things on the blog next week. We shall see.
Hope you had a good week and are looking forward to the weekend. See you next week.
Origami Halloween bats
Thursday, October 25, 2012

I mentioned on Tuesday that I enjoyed making some Halloween things using origami and that I was going to make some more, well one of the other things that I made were some origami bats.
I used this tutorial to make the bats and found them slightly more tricky to make than the pumpkins but after I had made a few, I understood how to do it.

All you need to make these is some black paper and I made them in 4 x 4 inch squares but you could obviously make them bigger if you wanted to.

This is Hollies artwork display that I decided to change and put up the bats instead.

I just taped some embroidery thread to the back of the bats and tied them to the rail. They looked a bit lost but I will be adding more Halloween origami to it tomorrow.

I tied them to the rail at different heights and spaced them apart.

Ideally I would have liked to use invisible thread but didn't have any so used silver thread instead.

Here are some close ups of the bats when they were hanging up.


Hollie really liked them and as she is only 4, she said she didn't want anything too scary, so I think they were perfect.
So, I have some more Halloween origami coming tomorrow. See you then.
Linking up to The Shabby Creek Cottage, Yesterday on Tuesday , The 36th Avenue, Somewhat Simple, Chic on a shoestring, Polkadot Pretties, Sew Can Do,
Subscribe to:
Posts (Atom)


Social Icons