
posts in
Gifts
Easter gifts for the girls
Thursday, April 02, 2015

As Easter is upon us I thought I would share what I have bought the girls for Easter.
For Amelia, we got her some touchy feely books from Sainsbury's. We managed to get them when they had their double up event so we were able to use £5 of points and double it up to get the 4 books and didn't cost us anything.

Amelia has been loving the threading lace and blocks, reels etc. when we go to softplay group, so I bought this seahorse set from the Early Learning Centre and I think she will love to thread the laces and all the characters.

Rather than get her an Easter egg, i picked up these Lindt little chicks from Homesense and they were on offer too!
Lastly I bought both girls a new placemat from Dunelm which has lots of woodland animals on it.

For Hollie for Easter, I wasn't sure whether to get her just an egg but that didn't happen and bought a few things I spotted on my travels!

I came across these Charlie and Lola books in the 99p shop and couldn't resist them as I know she will like them and I am trying to get her to read more, which has been hard.

Hollie kept mentioning how she wanted one of these wooden giraffes from Wilkinsons and so I thought I would pick one up for Easter as well as some little eggs as she wants to do some cupcakes and put them on the top.

Lastly I saw this pack of paper placemats in Staples which you can colour in and thought even if she doesn't use them as placemats, she would have fun colouring them in.

I think they will love their little gifts and might keep them busy for a little bit!
Are you buying gifts for your children or ones you know or just getting an egg? I would love to know how you feel about gift giving at Easter.


Handmade photo album
Wednesday, February 18, 2015

I love to give family and friends photos of the girls and for Christmas I decided to make some handmade photo albums to put some photos in and give as presents.
To make the photo album I used a 9 1/4 x 5" piece of card and a 6 1/4 x 5" card.
On the large piece, I scored it at 1" and 2" on the 9 1/4" side. Fold over the card at the 2" mark to make the album spine. Adhere the front piece to the back piece on the first inch of the card.


To store the photos in the album, I added some clear card envelopes to the inside of the album. I just stacked them on top of each other until you have the amount you want and fit in the album and then adhered them into the album back piece.

Next I punched 2 holes to secure the clear envelopes into the album and then added some ribbon.

On the front of the albums, I used some patterned papers from My Mind's Eye. I added a label from Spellbinders Nestabilities Label eight and stamped the word photos on to it. I punched out some flowers and butterflies using some Martha Stewart punches.
To jazz up the butterflies and flowers, I added some pearl gems.


These photo albums were quite easy to make and I think they make a cute little gift if you want to give a selection of photos but don't want to use a whole big album.
What do you think? Do you think they make good gifts? Would you be happy to receive one? Let me know.
Linking up with:
Sophie the Giraffe Strap
Thursday, June 19, 2014

While researching the KAM pliers on Ebay, I came across straps for Sophie the Giraffe teether toy. I thought this would be great to try to make with the the pliers as I had bought as Sophie the giraffe recently and it isn't cheap and so a strap to keep it secure would be a good idea.
I also came across a tutorial on how to make them on Leanne's blog. She gives you all the measurements and where to put the snap poppers.
The tools that I used were:
- The KAM pliers and parts.
- Snap poppers.
- Scissors.
- Ribbon e.g. grosgrain.

You will need some ribbon that measures 56 cm/ 22 inches in length and turn the ends over 1 cm and add a snap popper. I did make mine slightly longer so that it would hang longer. As long as you keep the outside measurements the same it will work if you would like it longer or shorter. You then need to measure 22 cm/ 8 1/2 inches and add another popper. This is the larger end which you attach to Sophie the Giraffe. From the other end you need to measure 14 cm/ 5 1/2 inches and add another popper. This end is where you tie it to the stroller. Make sure you keep all the poppers facing the same way too. Also you can add a bit of glue like I mentioned in this post to the ends before turning over to stop them fraying.
This what the strap will look like when it is made. It will have a large loop on one end and a smaller loop on the other.

When it comes to attaching the giraffe to the strap, it is quite simple.
You place the strap under the giraffes neck.

Then fold the strap over the neck.

Wrap the strap behind and under the legs.

and up over to attach the snap poppers together.

You just simply attach the other end to the stroller and it's secure.
I think the straps could be very handy. What do you think?
I'm having great fun with the KAM pliers and still have a few more things to make with them.
See you soon.
Pacifier Clip Holder
Friday, June 13, 2014

When looking online recently for dummy or pacifier holders, I came across a lot of varieties on Ebay as well as elsewhere. They were all so nice and pretty with characters like Minnie mouse and beads and letter beads to spell the babies name but I just wanted plain simple holders.
All these pacifier holders were made from simple ribbon and if you have seen my ribbon organisation, I have plenty of ribbon! I thought I would see how much it would cost to buy the tools. I managed to buy one of the Kam pliers for about £10 and it came with the screwdriver etc and press snaps in 2 sizes. I will be explaining more about the Kam pliers in another post soon. I also picked up some of the clips to attach to pushchair or clothes etc.
To make the pacifier holder, you need the following:
-Kam pliers and the accessories to fit the size of press snaps you are using.
-Screwdriver that came with the kit to change the accessories.
-Clips.
Scissors.
Liquid glue or lighter.
Liquid glue or lighter.
-Hole piercer ( I used Tim Holtz craft pick).
-Ribbon of your choice.


You need to decide how long you want the holder to be and add a couple of centimetres to allow you to fold over the ribbon before adding the press snaps, approx 7cms to create loop to attach pacifier and the same if you want the other end to be able to attach to a stroller as well as use the clip.
On one side make sure you add the clip on before add the second press snap as it won't go on afterwards. I made that mistake a few times!

On the other end you need to just add to press snaps to create the loop to hold the dummy. Also after I had finished making the holder, I added some liquid glue ( I used Ranger Glossy Accents from my craft stash but you could use others) to the end of the ribbons to stop them from fraying. You could do this before you put it together and also could heat set the ends with a lighter too.

These are some of the pacifier clip holder I have made as well. I could make so many with all the coloured ribbon I have!

I have a few more projects to use the Kam pliers for and will post them in the next few weeks.
Have a lovely weekend and see you soon!
Linked up to Diana Rambles, A Bowlful of Lemons, The Shabby Nest, Chic on a Shoestring, Live Love Rowe, The 36th Avenue, Artsy Farsty Mama, Glued to my Crafts.
Cute Little Candle Cake
Monday, January 06, 2014

I had seen a picture of this little cake made out of paper and a battery operated candle on Pinterest and was really intrigued by it and wanted to give it at making one for my mums birthday, which was at the end of December.
I started by cutting out a large scallop circle for the bottom of the candle and cut out a hole for the switch. To secure the scallop circle to the candle I used some foam squares, one on top of another as the candle had tiny feet so needed double height to make it level.
I then cut out a smaller scallop circle for the top of the candle which I then created a hole for the light and folded down the sides of the scallop circle.
Then I cut out a piece to put around the sides and added some ricrac ribbon to make it more decorative.

To decorate the top of the cake, I punched out some little flowers from the Martha Stewart 3 in 1 hydrangea punch and used the smaller flowers and added some stickles to make them sparkle.
My Mum really liked the little candle cake and I am really pleased with how it turned out.
These little candle cakes are great little gifts and it wasn't too difficult to make either.
Card gift boxes
Saturday, January 04, 2014

For a few Christmas presents, I decided to make some handmade cards and wanted to make some boxes to store them in.
I decided to make them with the envelope punch board. I found a tutorial on YouTube by Lizy Bartaby where she makes a card box that was big enough for UK c6 size envelopes, as most tutorials on YouTube are for US size 51/2 x 41/4 cards.
The box fitted 4-5 cards and envelopes depending on how much embellishments the cards have on them.
I also used the envelope punch board to make some bows like I have made for these boxes in my last post.

The front was still quite bare, so I added a label die cut from Spellbinders Nestabilities label one and then added a heart from the Clearly Besotted Love Hearts stamps and then some little punched hearts.
To secure the flap at the back, I used a small piece of Velcro and it worked very well.


I made three different coloured boxes but kept the bows the same colour.
I really love these boxes. They make great little gifts and are great packaging to store cards and are nice and sturdy.
Hope you have had a great week and have a nice weekend.
See you soon.
Link Parties I have linked up to are here.
Christmas gift boxes
Monday, December 23, 2013

For a couple of Christmas presents I have bought this year, I needed to put them in a gift box as they were to fragile to just wrap up in paper.
These presents aren't very big and so didn't need large gift boxes, so I wasn't going to hunt out small gift boxes in the shops, I decided I would make them.

I found the tutorials on Chicnscratches 12 days of Christmas videos that Angie has made recently and they are perfect size for the presents.
The first box is made using this tutorial from Chicnscratch. I decided to make it with white card and then use some pretty patterned paper from Doodlebug as a layer.
On top I made a bow using the envelope punch board and this tutorial from Knall crafting.
I made a little tag from the Clearly Besotted tag it dies and punched out a little tree.
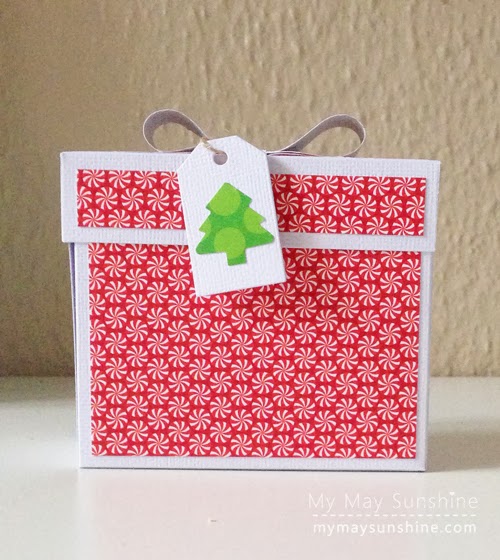
The second box, I used this tutorial from Chicnscratch.
I decided to make it with the Doodlebug Home for the holidays papers, tied it with some green gross-grain ribbon and a tag the same as the previous box. Love the papers on this box, so cute!


I won't show the gifts that are in the boxes are the recipient might read this but I just wrapped the gifts in some lovely red spotty tissue paper.
I have finished wrapping all the presents and am so glad. If I haven't got it or done it now it, we will have to do without! I'm 37 weeks pregnant and trying to entertain a 5 year old in the holidays, so I'll be glad to have a rest.
Hope you have a lovely Christmas. See you soon.
Christmas stocking gift tags
Wednesday, December 18, 2013

This year, for my gift tags, I decided that I would make some and decided to use the stocking stamp Clearly Besotted Stamps Institches set.
I love the images in the set and have used some of the images on my Christmas cards that I have posted here and here.

To make the gift tags I created the tag from some kraft card and are quite large at 4 3/4 x 2 1/4. I decided to use a circle of red card under the stocking and then use a small die from the Spellbinders Nestabilities label 8 dies, to put the sentiment and snowflake on.
I went with two different sentiments, one from the Clearly Besotted Stamps Signature Christmas and one from the Marion Emberson Sparkling Christmas.
I kept the tags quite flat and just added a little red gem to the centre of the snowflake to add some sparkle.
On the back of the tags I added the to and the from, from the dovecraft gift tag stamp and added some red bakers twine to the attach the tag to the present.


Hope you are having a great week and it's only one week away to Christmas day, It has gone so quickly. See you soon.
Subscribe to:
Posts (Atom)


Social Icons