
posts in
craft storage
My Craft Room
Wednesday, March 28, 2012

Over the last five weeks I have been showing you different ways that I organise things in my craft room. Today I am going to show my actual craft room.

It measures 8 feet wide by 7 feet deep and is supposed to be my dining room but I prefer the dining table to be on the laminate rather than the carpet so took over the space for my craft room.

For the shelves, I have three small expedit cubes that I have just put one on top of the others but placed in the middle of the two.

This is the left hand side of the room. The top of the tall cupboard has a lot of binders and some Ikea magazine folders to hold things like paper for the printer and plastic pockets. The box at the top is the extra craft things for my daughter and the two plastic drawers hold paper for my daughter to draw.

The wall shelves hold things like notebooks, cuttlebug and embossing folders, tub of twine, box of flowers and my desk organiser, which isn't on my desk!

I like to keep my desk quite clear unless I have lots of paperwork on it but don't like to keep it messy for too long or it tends to get messed up courtesy of my daughter. I keep most of my pens and office supplies I use regularly in the drawers below the desk. The desk is Ikea Vika Amon and the chair is Ikea Snille chair.

This is my craft desk. It is made from 2 black Ikea lack tables, one on top of the other, and a Ikea Vika Amon table top on the top of them which has been secured with brackets. I already had these items in my home, even the brackets and the chair use to be in my kitchen but was never used and so it was great to be able to use them for something I knew I would use.

This is what is on the top expedit cube. When I showed the brad and eyelet boxes, they were on the shelf below, but I moved them and the Ikea Rationell Variera shelf up to the top to allow me to use the shelf below for the boxes. The red spot tins have labels in the bottom tin and pins in the top tin. The Ikea Krus container has bakers twine which I posted about here.

The top left has stamps which I explained more about here and dies which I showed the binder here. The top right has inks, embossing powders and heat tool and box of gifts. The bottom left has craft and office supplies and alphas and bling. The bottom right has 6x6 paper pads and 12 x12 paper pads.

The top left has my sewing machine, threads and sewing kit. The top right has my ribbons which I explained how I store them here. The bottom left has extra supplies and the bottom right has random things in it.

The top left has card and the top right has envelopes and extra adhesive. The bottom left has fabric and the bottom right has more random things.

This is behind the door in the tall cupboard. Top shelf has cords and external hard drive, middle shelf has cards I have made and the bottom shelf
has things like glue gun and sticks.

This is where the buttons are on the side of the top expedit cube, I showed you them here. Opposite is some Ikea Rationell baskets. They just slide on and off the 2 screws which are in the side of the cupboard. Next to them is an Ikea Grundtal magentic knife rack and the Ikea Grundtal containers which have paper clips in.

In the top basket I store tools that I want to keep out of the way of my daughter and the bottom basket is full of adhesives.
The small drawers with my printer on hold my punches. The top two drawers are lined with Ikea Rationell Variera drawer mat which stop the punches moving around.

These are small punches in the top drawer.

Larger punches in the middle drawer.

Then the border punches are in the bottom drawer.
So that is my craft room and how I organise it. I came up with the craft table from an post on Ikea Hackers and how they had used two lack table as a kitchen bench and is great for sitting next to the window as the window is so high up and being able to look outside. I don't really like to have the desk face the wall but it was the only way I could fit everything in. As my house isn't that big, it is great to be able to have a small space for me and my crafts.
Have a great day.
Linking to:

 |  |  |  |  |  |  |  |
 |  |  |  |  |
Craft Room Organisation - Kids Crafts
Wednesday, March 21, 2012

For the fifth part of Craft Room Organisation, I wanted to show you how I store kids crafts.
To keep Hollie entertained, we keep a stash of craft items like lolly sticks, pompoms, googly eyes etc and to store them, I decided to separate them into little containers. This way it is easy to see what we have and how much we have left.

To store all the craft items, I organised them onto a shelf and labelled them using my label maker, to make it easy to find each item.

We keep crayons and pencils, felt pens and magic pens in their own containers. Glue and scissors are kept in a little pink pot.
Hollie likes to make little aeroplanes and butterflies out of the lolly sticks.

We keep all of Hollies stickers together in a plastic folder and the beads, that she likes to create bracelets with the pipe cleaners, in 4 magnetic spice jars that stick to the stand they came with.

To make butterflies, we use filter papers and she can colour them in and add things like the pompoms , buttons, eyes etc.
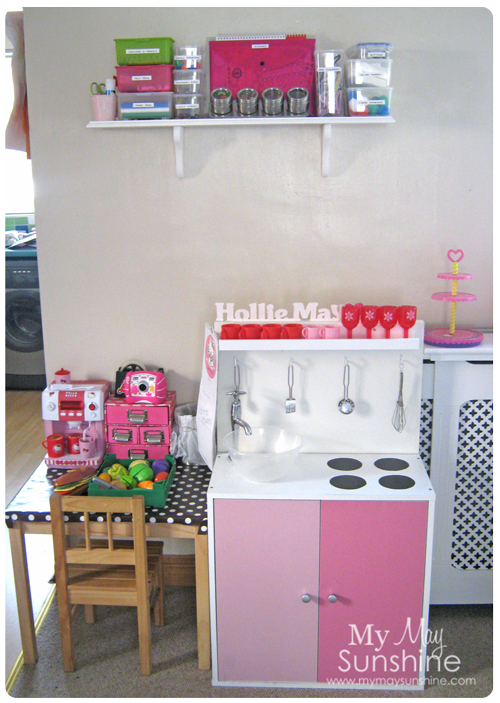
This is Hollie's little corner of the room. She has her desk and kitchen right below the shelf so it is easy for me to access the craft items for her.

Her kitchen is made out of a cupboard and an old Ikea desk top that was quite scratched at one end, so I turned it in the back of the kitchen. I added a Ribba shelf from Ikea and some hooks too.

I also found an old tap in my grandmas garage and added an old mixing bowl and some sticky back plastic circles for the hob.
The table has some brown polka dot oilcloth fabric on it to make it easier to clean than the bare wood.

To store all the papers, we use 2 drawers. Top one has the card and paper ready to use and the bottom has the papers that have been drawn on.
Every now and again, I go through the drawer and either keep them or recycle. Most only have a couple of lines or squiggles, which she won't miss.
The ones that I do keep are stored in her bedroom.
The drawers are kept on my shelves along with a box full of extra craft supplies.
Hollie also really enjoys painting and using play doh and all the supplies for those are kept in a kitchen cupboard, which has a child latch on it, as she tends to help herself otherwise, especially the paints.
So that's the last part of the Craft Room Organisation. Next week I am going to show you my craft room.
See you soon.
Linky to:
Craft Room Organisation - Buttons, Washi tape and Dies
Wednesday, March 14, 2012

The fourth part of my craft room organisation is about storing buttons, washi tapes and dies.
When I have organised things in my craft room I tend to organise them by colour rather than style or brand, but when it comes to organising buttons, I keep them organised into 2 types. First set are the buttons I bought from Sew Sweet and the second set are all the other buttons.
I used Ikea Rajtan spice jars to store the buttons and ended up with 10 jars. 5 jars with the buttons from Sew Sweet and 5 jars with buttons from other brands. I chose to keep them this way so that I know which buttons are from Sew Sweet.


To store the jars, I used 2 Ikea Bygel baskets and they are attached to the side of one of my units.


Under the lower basket is where I store my washi tape.

I use a wooden rod that is hooked on to the underside of the basket using Ikea Bygel hooks.


The washi tape simply just fit onto the rod. It's really easy to get the tape on and off.

I then just used another Bygel hook to add my Sew Easy twine which are clipped together on a binder ring.
I chose to store them in a binder format rather than CD cases as I wanted something small in size to store them and I wasn't sure how long the CD cases would last.
So when it came to the binder, I chose to make one. I used two Bind it all covers which measured 7.5 x 5 inches and covered them using Papermania's Birdsong papers.

I created a label using a Spellbinder Nestabilities label one die and used the Echo Park Summer Days paper and some Papermania foam alphabet stickers.

To secure the dies, I used some kraft card cut to 7.5 x 5 and some magnets to hold the dies securely. Then I just added a label to the page with the name of the die.


Making the binder using binder rings enables me to just add more dies when I need to, so it is not too bulky at the moment but can be added to when needed and can always make more binders if necessary.
So that's a little bit more on how I organise and store things in my craft room.
Next week's craft room organisation is on kids craft organisation.
See you soon.
Linking to
Subscribe to:
Posts (Atom)


Social Icons